Hey Space Cadets what is going on?
I'm Cmdr TwingTwang and welcome to the outfitters.
Today we'll be talking about the Vulture again. The Vulture is a space superiority starfighter that offers great performance and manoeuvrability. Ballparking at around twenty million credits once equipped the Vulture also boasts incredible value for money in combat providing unparalleled bang for the buck.
In my first Vulture Outfitters article I gave my first impressions of the ship and I had time to return to the vulture after a long time flying other ships and I've got to say I'm still impressed. The vulture turns on a dime, and while it's not super fast on the straight it is no slouch when it comes to holding position in combat. Most recently I've also been flying a sidewinder and a lot of the lessons I learned in the Vulture helped me in the sidewinder, and vice-versa.
General Loadout
I'm going to assume at this point that you have a Vulture to hand and enough money to fit Class-A Power Plant, Distributor, Thrusters and Shields. My sensors and life support are D to save power and the Frame Shift is in power group 2, so inactive during combat.
This means you should look something like this before you start outfitting:
BH: 1I Lightweight Alloy
RB: 4A Power Plant
TM: 5A Thrusters
FH: 4A Frame Shift Drive
EC: 3D Life Support
PC: 5A Power Distributor
SS: 4D Sensors
FS: 3C Fuel Tank (Capacity: 8)
That build is going to total just under fifteen million, and leave you plenty of spending money for shields, weapons and toys.
Power Management
Like the viper - or any other fighter - the Vulture is really limited by its power plant. Even the 4A only gives you 15.6 MW to play with so you have to balance your priorities carefully but since your FSD can safely power down when the hardpoints deploy you can use the full 15.6 on your combat loadout. It only saves you an extra 0.45 but every little helps.
This Vulture build was designed with some of the community goal conflict zones in mind, so I've chosen a Class-D Life Support that runs all the time, instead of a Class-A that gets shut off when the hardpoints deploy. An escort fighter can deal with the short flight time caused by the life support cutting out but a warship needs to stay in the fight a lot longer.
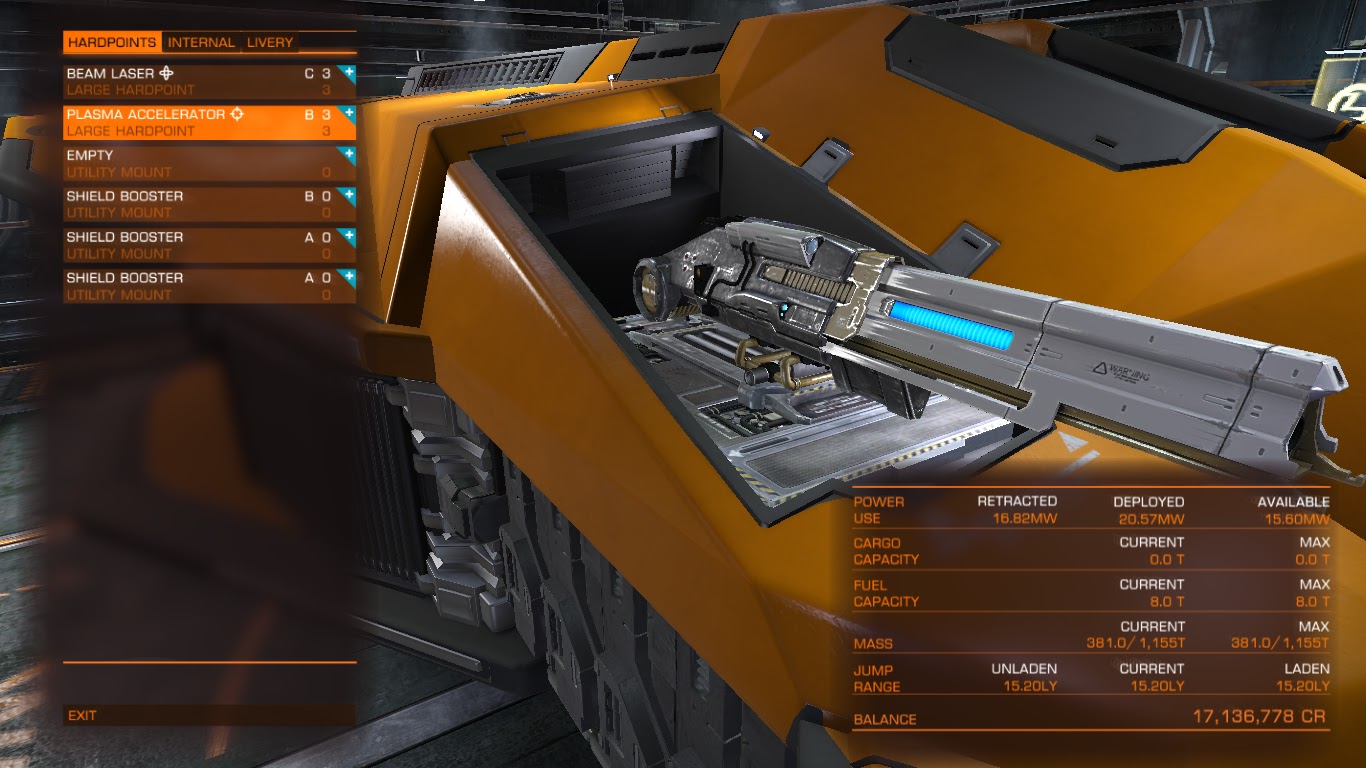
Hard choices in hard points
In my previous vulture outfits, I've been using paired C3 Gimbal Beams, dual E3 Gimbal Burst and dual E3 Gimbal Pulse Lasers. Going back to the sidewinder has taught me to fly with fixed lasers again, and after trying several loadouts I flew my sidewinder with a fixed beam and gimbal cannon and had a lot of success with that combo. The fixed beam allows you to track your target and ignore chaff, and the cannon allows you to start really tearing into the hull once the shields go down.
The dual gimbal burst lasers I used before are a quality compromise, and don't have the punch of the beams but only draw 1.65MW each - still a massive 3.3MW energy budget for weapons.
Dual C3 Gimbal Beams are only a fraction higher at 3.56MW, but drain the banks faster and overheat more readily. In a long fight, your overheating beams will cut out and reduce your damage output so it might be that the lower rated burst lasers actually fare better. In addition, you'll have to reduce your shields or thrusters to find the power to run them.
The higher damage per second means the C3 Fixed beams cost a fraction more energy, and since the Vulture has no trouble staying on target they are a good contender, however having at least one gimbal really helps you target submodules for power plant takedowns so I've moved to asymmetric options.
The next option is the high power Beam+Plasma option. Costing 3.75MW it's not much more expensive than dual beams, and really does the damage. I found that heat problems upset me here, and while I dished out a lot of damage I also took quite a lashing as I had to use a lower-grade shield. Overall I didn't feel as comfortable using plasma - smaller targets were literally hit or miss, too often miss... Meanwhile against bigger ships like anacondas I found the my ship got super hot, and thermal overload shut down both weapons leaving me sitting duck in my reduced power shields.
Flying the vulture with a C3 Gimbal Beam and a C3 Gimbal Cannon worked out really well for me, and it's a tough call to say if I preferred it to dual burst lasers. Your beam laser is slower at slicing through shields, but the gimbal really helps it lock on to ship modules and get power-plants quickly too. The Gimbal Cannon is great at wrecking hulls, and can try to target modules too. This combo takes only 2.53MW which is a huge advantage and saves you an extra MW to for other systems.
I found the gimbal frag cannon pretty good too. Its damage output at point blank range is scary good and its at that range you can afford the fixed-forward, which I think uses a lot less power. The gimbal cannon felt like it hit ship submodules, while the fragger doesn't really do anything that precise. Again this is a fairly low power combo at 2.8MW but I think I just preferred the straight cannon on the Vulture.
A note on the Gimbal beam is that it can struggle to track, especially against chaffing cobras. Just untarget the ship and it'll revert to fixed-forward, allowing you to line up your shot and keep dealing damage until the chaff expires. I found the cannon doesn't suffer from this so much, as you will only shoot when you have a clear line of fire and by the time you open up the cannon your quarry will often have burned through their chaff. You can often just wait for the chaff to expire too, and use the chance to refill your laser banks and let your smoking guns cool down.
Lastly, if you are building an escort fighter or bounty hunter for a wing then a Class-A life support that powers down when the hardpoints deploy should be fine as you'll be returning to the station to collect the bounty anyway. In a ship like this, I'l might pick the fragger instead of the cannon, as you will have time to reload and want to maximise your damage per second.
Thrusters
Soaking up a massive 6MW, the 5A thrusters eat your energy budget for breakfast and while you can save about 0.5MW for each grade you drop down I didn't fare as well with 5B thrusters so wasn't encouraged to fly with the 5Cs. It may be a placebo effect, and I've not done any serious instrumentation on their performance but even with the smidgeon of extra power you can throw into weapons or shields I found that Manoeuvring with the 5A was just that much better, so I'm going to keep recommending them.
I tend to divert power to engines to top the capacitor ready for a boost but rarely fly with more than one pip in engines, better power management helps.
I'd be interested in doing some instrumented tests on the difference between the 5B and 5A thrusters, because if the difference is slight, then the extra power may be better used elsewhere, but I ~felt~ better with the 5A which is all I've got to go on so far.
Shield Options
One trick I developed from flying a sidewinder recently is that you can afford to have an extra shield booster (or two) in power group 2. They will be powered down when your guns are out but you can stow your hardpoints and get an extra 20% shields strength (or more). This is super useful if you are trying to get out of the line of fire, or if you know you won't need to shoot for five seconds.
I tried a build without Shield Banks, which is a difficult decision. In the vulture I'm rarely getting tagged so their main use is to increase your income by staying in the fight non-stop. However I'm not flying the Vulture for the income, so don't mind holding my position for a minute and letting the shields restore before I get back into the fray. If you are a big PVP player, then you'll have more use for the shield bank, but I'll leave that discussion for another day. If you do want it, then add your shield bank into power group 2 or 3 as you won't have the juice for it during combat.
This leaves me with a 5A Shield bank and three Class-B Shield Boosters. One used the extra MW I freed up from my hardpoints and two of the boosters are in the secondary power group so don't activate during combat, but thats OK. I found that with the weapons overheating I had to take breaks and anecdotally stowing the hardpoints helps them cool down so I was putting my guns away even for a five second break between ships and getting the benefit from the extra protection too.
For the technically minded, (or those on a budget) the Class-5C shield generator with a Class-B shield booster gives you better protection than a Class-A shield on its own, for a smidgeon less power consumption and about a tenth the purchase price. (600K instead of 5M Credits) I had to do a lot of value-for-money comparisons building a sidewinder on a budget, and a lot of lessons like this transfer across to the larger ships. Your real currency is the power consumption in the vulture, not the purchase price, but it's a point of interest nonetheless.
The last note on shields, is that I'm probably being over protective here. The shields on my vulture hardly ever get taken down, and while that could be attributed to the extra shield booster, the nimble turning circle of the ship does a lot of work for you. Its just as viable to put less energy into the shields if you do want to run two high energy weapons however every now and then you get sandwiched between two anacondas and the extra shields really pay off.
Closing thoughts
Overall, my Vulture build came to about 23M Credits so the insurance is a little over a million and I had a few million in the bank for insurance so wasn't much worried about wrecking a few in combat trying out different loadouts. A Vulture on a Budget can be had from about 16.5M by fitting Class-B Thrusters and Shields, and the insurance there is going to be a little over 850K, but the ship isn't quite as strong.
It's a competent ship with plenty of options but I found the biggest problem was those overheating lasers. Beam and Cannon was the most fun, and didn't drain the banks as much as the dual laser combinations, so I'm going to keep those for a while.
I've not talked about colours yet ... I'm flying mine orange to match the Orion Arm Privateers who I'm flying with these days but I'm really coming round to the look of the blue vulture. Which scheme do you think looks best? Which paint style from another ship would you like to see on the vulture?
No comments:
Post a Comment